


Contact form · Web Dev 2 · Learn the Web
Published on January 17th, 2018 by Syed Hassan Ali
Goal
We’re going to look at how to make a function contact form. With only HTML, and no backend server, it would be impossible to actually send messages—but there are some services that’ll help us out. We’ll use Formspree to help make our contact form messages send.
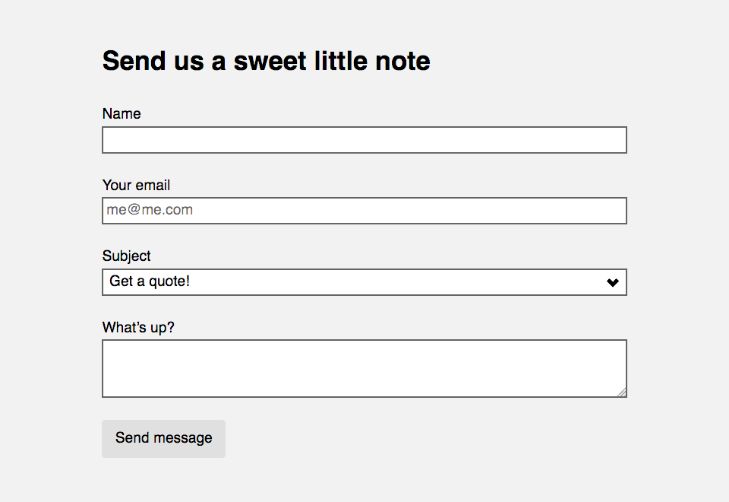
This is what it should look like when it’s done:
-
Type it, type it real good
Remember the purpose of this lesson is to type the code out yourself—build up that muscle memory in your fingers!
1 Project setup
The form isn’t going to work at all without running on a web server—the quickest way to get the form onto a web server is to use GitHub.
Fork this repo.
Make sure you clone it to your computer.
- contact-form
- css
- grid.css
- main.css
- modules.css
- type.css
- index.html
This repo has the HTML boilerplate and all the CSS files hooked up. The main.css file has everything we’ll need for today.
2 Write the basic HTML
Before we hook the contact form into Formspree let’s write all the HTML inputs necessary to make the form.
index.html⋮Continuing code from earlier in this lesson…
</head>
<body>
<section>
<div>
<h1>Send us a sweet little note</h1>
<form>
<div>
<label for="name">Name</label>
<input id="name">
</div>
<div>
<label for="email">Your email</label>
<input id="email" type="email" placeholder="me@me.com">
</div>
<div>
<label for="subject">Subject</label>
<select id="subject">
<option>Get a quote!</option>
<option>General question</option>
<option>Just to talk</option>
</select>
</div>
<div>
<label for="details">What’s up?</label>
<textarea id="details"></textarea>
</div>
<div>
<button type="submit">Send message</button>
</div>
</form>
</div>
</section>
</body>
</html>
B
CAK
ALI
IJ
JK
LP
PT
XAB
ABAE
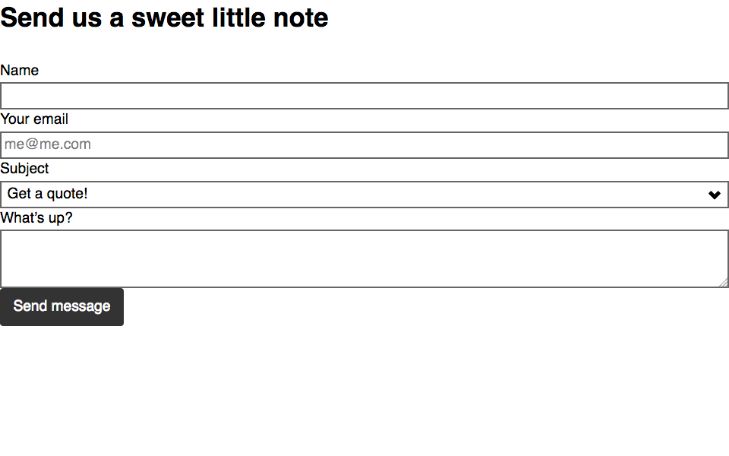
AE After writing out that HTML, this is what we should see:

That’s pretty darn ugly…
-
Line I
Every element related to the
<form>must be wrapped by this tag. -
Line J
I usually wrap a
<div>around every<input>because it gives more layout control—especially when using the grid system. -
Lines K–L
It’s extremely critical that the
for=""attribute on the<label>matches theid=""attribute on the associated<input> -
Line P
The
placeholder=""attribute allows us to put an example into the<input>field.It should never be used to replace a
<label>!Also notice the
type="email"attribute—this helps the browser validate the allowed information in the field. -
Lines T–X
We could use a regular
<input>for the subject but I thought it’d be fun to have a few items to choose from.The
<select>input will present the user with a menu of options to choose from. -
Line AB
The
<textarea>element is a multiline text field, people can pressReturnin the field to make new lines without submitting the form. -
Line AE
A
<button>tag is used to submit the form’s information. It cannot link to another page.Without the `type="submit"~ attribute the button won’t actually submit the form—it’ll require JavaScript to be functional.
3 Add Gridifier, Typografier & Modulifier
The default look of forms is pretty abysmal—Modulifier has some slightly nicer form defaults, do let’s add that code into your website.
- contact-form
- css
- grid.css Get the code and paste it
- main.css
- modules.css Get the code and paste it
- type.css Get the code and paste it
- index.html
The web dev tools CSS files need to be populated:
- ·Go to Modulifier and copy the default CSS into
modules.css - ·Go to Gridifier and copy the default CSS into
grid.css - ·Go to Typografier and copy the default CSS into
type.css
With the web dev tools in place, it looks better:
4 Add some basic styling
Now let’s add a few classes to the form elements to make it look nicer.
The main.css file already has a class, .contact, to set the background colour for the <section>
index.html⋮Continuing code from earlier in this lesson…
</head>
<body>

  <section class="contact pad-t-2 pad-b-2">
    <div class="max-length">
      <h1>Send us a sweet little note</h1>

      <form class="push-0">
        <div class="push">
          <label for="name">Name</label>
          <input id="name">
        </div>
        <div class="push">
          <label for="email">Your email</label>
          <input id="email" type="email" placeholder="me@me.com">
        </div>
        <div class="push">
          <label for="subject">Subject</label>
          <select id="subject">
            <option>Get a quote!</option>
            <option>General question</option>
            <option>Just to talk</option>
          </select>
        </div>
        <div class="push">
          <label for="details">What’s up?</label>
          <textarea id="details"></textarea>
        </div>
        <div>
          <button class="btn btn-light" type="submit">Send message</button>
        </div>
      </form>
    </div>
  </section>

</body>
</html>
B

CAK

ALE
EF
FI
IJ
JN
NR
RZ
ZAE
AE
And now the form should look good—like this:
-
Line E
Add a few classes to make the
<section>nicer:.contact(inmain.cssalready) &.pad-t-2and.pad-b-2fromtype.css -
Line F
Add the
.max-lengthclass so the form’s width doesn’t go crazy on us. -
Line I
The
<form>tag has some default margins that we’re going to remove. -
Line J
If we add
.pushto all the<div>tags (except the last) we can space all the inputs out nicely. -
Line AE
Add the
.btnand.btn-lightclasses to the button to make it look better than the default styles.
5 Hook the form to Formspree
Now that our form looks good we’re going to hook it into Formspree so that our messages actually send.
With HTML only our forms don’t do anything. We can do some processing with JavaScript but without a backend server we can’t send emails. So Formspree is going to be our backend server.
index.html⋮Continuing code from earlier in this lesson…
</head>
<body>

  <section class="contact pad-t-2 pad-b-2">
    <div class="max-length">
      <h1>Send us a sweet little note</h1>

      <form class="push-0" method="POST" action="https://formspree.io/bradlet@algonquincollege.com">
        <div class="push">
          <label for="name">Name</label>
          <input id="name" name="name">
        </div>
        <div class="push">
          <label for="email">Your email</label>
          <input id="email" type="email" placeholder="me@me.com" name="email">
        </div>
        <div class="push">
          <label for="subject">Subject</label>
          <select id="subject" name="_subject">
            <option>Get a quote!</option>
            <option>General question</option>
            <option>Just to talk</option>
          </select>
        </div>
        <div class="push">
          <label for="details">What’s up?</label>
          <textarea id="details" name="message"></textarea>
        </div>
        <div>
          <button class="btn btn-light" type="submit">Send message</button>
        </div>
      </form>
    </div>
  </section>

</body>
</html>
B

CAK

ALI
IL
LP
PT
TAB
AB -
Line I
The
<form>tag gets two new attributes—as shown in the Formspree documentation.- ·
method—POST, tells the browser how to send the information to the server. - ·
action— The URL to the server the information should be sent—make sure to change it to your email address!
- ·
-
Line L
Every field in the form now gets a
name=""attribute. It doesn’t really matter what thenameis but a few of them are specialized:- ·
name="email"— Formspree will use this as the email’s “Reply To" entry. - ·
name="_subject"— Formspree will use this as the subject of the email message
You can also provide the URL for a “Thank You" page—check out the Formspree documentation to see how to do that.
- ·
6 Commit, sync, test
Commit & sync the code to GitHub so we can test that it works.
If you try to submit on your local computer Formspree will give you an error message.
After the website is live, on GitHub, go to the github.io URL and submit your form!
7 Confirmation in your email
The first message you get from Formspree will be a confirmation one. You have to go to your email and confirm your email address! After that Formspree will just send the message to your email address.
Drop it into Markbot
Drop the final, coded exercise into Markbot and fix all the errors until Markbot gives you all green (and maybe a little yellow).
Be sure to keep the green check open to show the teacher!
-
Can’t submit
Markbot won’t let you submit this exercise because it’s getting checked by the teacher during class.
Show teacher for marks
Be sure to call the teacher over and show them that you’ve completed all these steps to get your mark.
-
Red sticky note
This is a good use of your red sticky note.
https://learn-the-web.algonquindesign.ca/courses/web-dev-2/contact-form/